MS Word - Auto Populate Template
Setup Instructions
The Scribe MT platform will auto-populate demographic field data when properties and fields are added to a template. This guide is provided by Scribe to help you set-up your own templates. Scribe also offers this service for an hourly rate.
1. In MS Word 2003 and below, click File>Page Setup, and set your desired margins on the Margins tab. On the Layout tab, be sure to select “Different First Page” and click “OK”
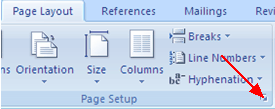
In the MS Word 2007 ribbon interface, go to Page Layout>Page Setup and click the arrow in the bottom right hand corner of the section to open the Page Setup box. Set your desired margins on the Margins tab. On the Layout tab, be sure to select “Different First Page” and click “OK”
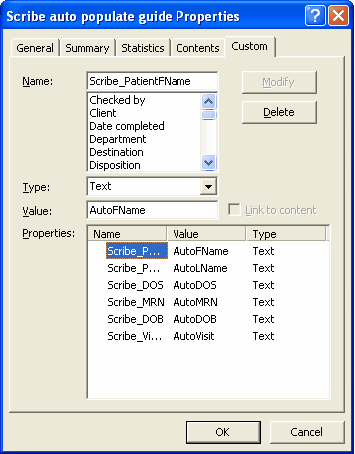
2. To set up auto-populating fields in word 2003 and below, click File>Properties and then the Custom tab.
In MS Word 2007 ribbon interface, click on the Microsoft Button (upper left hand side of the screen) and select Prepare>Properties, then click on Advanced Properties to open the Properties box. Click on Custom.
3. In the Name field input Scribe_xxx, where xxx is the demographic field that corresponds to the Scribe MT platform as follows:
Demographic field in Scribe MT platform |
For Word’s ‘Name’ field |
Available for auto-population? |
First Name |
Scribe_PatientFName |
Yes |
Last Name |
Scribe_PatientLName |
Yes |
MRN |
Scribe_MRN |
Yes |
Date of Birth |
Scribe_DOB |
Yes |
Visit ID |
Scribe_VisitID |
Yes |
Date of Service |
Scribe_DOS |
Yes |
FullName |
Scribe_Patient |
Yes |
PatientAddress1 |
Scribe_PatientAddress1 |
May be available in Scribe Complete if the information is sent to Scribe by the Physician Scheduling System. |
PatientAddress2 |
Scribe_PatientAddress2 |
|
PatientCity |
Scribe_PatientCity |
|
PatientState |
Scribe_PatientState |
|
PatientZip |
Scribe_PatientZip |
3. In the Value field, input a descriptive name that will appear as the field placeholder in the template. The descriptive name can be any naming convention meaningful to the transcription team.
In the example that follows, the AutoXxx naming convention was used for the Value field.
4. In the template, place the cursor in the exact location where the demographic field data is to be auto-populated.
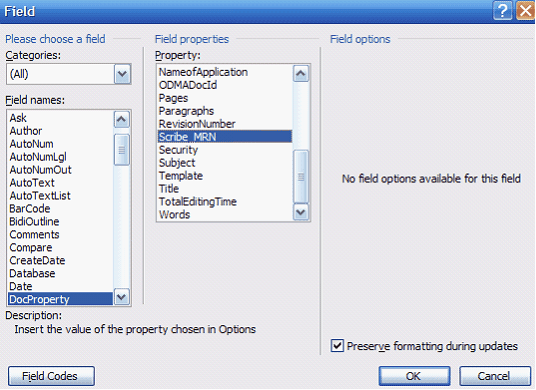
5. In MS Word 2003 and below, click Insert>Field.
In MS word 2007, go to Insert>Quick Parts>Field
6. In Field names, highlight DocProperty.
7. In Property, highlight the appropriate name, e.g., Scribe_MRN, and click OK.
A sample letter template with auto-populate fields is provided below. Note: to see the fields in a finished template, you can hit Alt-F9. This allows you to toggle between displaying the fields and displaying just the field result. Be sure to save and close your document with the field properties hidden.
Note: The auto-populate feature is activated by clicking ‘Save’ in the Demographic area of the Scribe MT platform.
AutoDOS
Re: AutoLName, AutoFName
MRN: AutoMRN
DOB: AutoDOB
Visit: AutoVisit
Dear Dr. Smith:
Thank you once again for this kind referral. I will continue to keep you informed about his/her progress.
Sincerely,
John Doe, M.D.