The Scribe upload Tool is a secure, web-based application allowing for quick and simple upload of dictation files directly to the Scribe platform. Files can be recorded via microphone directly to the local PC hard drive, or from any handheld device supporting .wav, .wma or .dss files that can be connected to the PC via USB cable.
To view any error messages that can be generated in the process, please refer to Upload Tool Error Messages.
Using the Scribe MD platform dictation file “Upload Tool”
The Scribe dictation Upload Tool that allows the user to easily upload dictation files directly to Scribe from the Scribe MD platform Pending page. This Upload Tool is still in the BETA testing phase, but is being released to selected customers as a part of our testing process. Permission to have the Upload Tool activated in your Scribe MD account can be requested by contacting us at [email protected].
NOTE: These instructions assume that you have already downloaded your dictation files to a folder on your hard drive. At the end of the Upload Tool instructions, you will find:
• Generic instructions on downloading dictation files from your handheld device to your PC
• How and where to search your hard drive for the dictation files you wish to upload (step 3 – Browse).
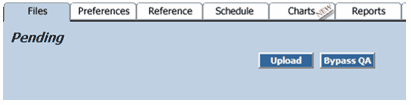
1. Logon to www.scribe.com and go to the Pending page. Click the “Upload” button.
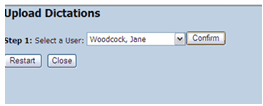
2. Select the dictating user for whom the files belong and click “Confirm”.
NOTE: Only one user can be chosen for each instance of “Upload”. The dictator (User) must have the “Can Dictate” role permission checked for each appropriate group to upload files to.
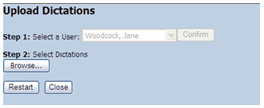
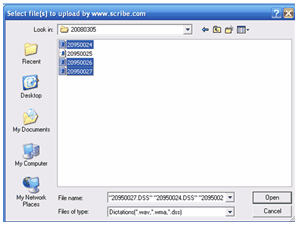
3. Click the “Browse” button to search your computer’s hard drive for files to upload.
You can select multiple dictations by holding down the Shift or Ctrl key on your keyboard while selecting files.
NOTE: If you have selected an incorrect file to upload or selected the incorrect user, you can delete the row by right clicking on the row and select “delete this row”. To begin again and select other files, click on “Browse”.
4. The files to be uploaded will now appear in the Upload Tool window. You may left click any field (except user and file name) to make desired changes to Group, Priority, template, MRN, and visit ID. Note that the priority selected must match the priority in the processing for the group or the upload will error.
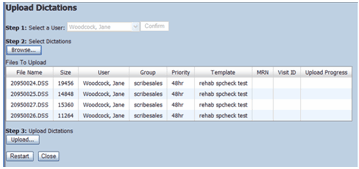
5. Left click the MRN or Visit ID field (if desired) to add information for each file and click OK.

6. Right click any field to either “Apply the (selected) value to all rows” or to “Apply all values to all rows”.
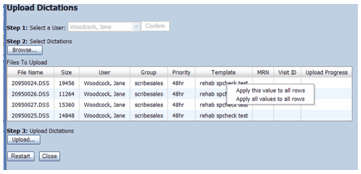
NOTE: if any of these actions are applied in error, information can be re-entered by right-clicking individual fields and making corrections.
7. Click the Upload button.
![]()
Upload progress for the files can be seen in the “Upload Progress” column
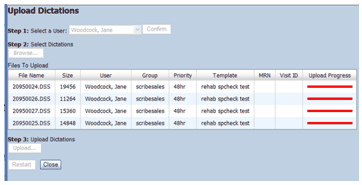
When all files are uploaded the Upload Tool will display “Step 4: Complete”.
The dictation file names assigned to the file by scribe will appear in the Upload progress column next to each file.

Write down the Dictation IDs for your future reference or hold down your left mouse button and scroll over the window contents to select, then click Ctrl + C to COPY, and Ctrl + V to PASTE your selection into a Word document or notepad. This can be used as your log of the uploaded Dictation ID’s.
Click “Close” to close the Upload Module.
8. Your uploaded files on are immediately viewable on the Scribe MD platform “Pending” page, upon refreshing the page (click F5 to refresh your Pending page to see the changes).

To view any error messages that can be generated in the process, please refer to Upload Tool Error Messages.
Downloading and Saving dictation files from your recorder to your PC
While you can browse directly to your handheld device (Step 3 of the Upload Tool instructions) and upload files to Scribe directly from the device, it is highly recommended that you save a backup copy of your dictations to a folder on your PC. The instructions that follow describe this process.
Any device: Save files from your handheld device to your hard drive for upload:
1. Plug in your digital device to an available USB port on your computer.
2. Note: if the device has never been plugged in before, you may have to enable it by finding the “found new hardware” icon in your computer’s system tray (lower right hand corner of the screen). If you cannot find the device or the icon, contact your Network Administrator for assistance.
3. Go to “My Computer” and open the device as if it were an external hard drive. Save the files to a folder on your PC so that you have backup copies of your dictations saved locally.
4. It is recommended that you delete the files from your handheld device, once they have been saved to your PC.
Olympus device: Using the DS Player Pro software to download dictations to your PC:
You may bypass the software that comes with the Olympus dictation device and use the method described for Any Device above, OR you may continue using your Olympus software to download files only once the following modifications are made:
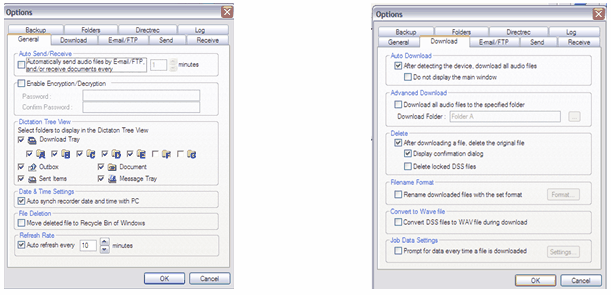
1. Go to Tools>Options>General tab, and make sure that the options under “Auto Send/Receive” are unchecked. All options on this tab should be checked as shown below.
2. Go to Tools>Options>Download tab, and make sure that the “Auto Download” settings appear as shown below.
3. You will need to delete files from the Olympus dictation module after they are uploaded to Scribe. For this reason, we highly recommend you enable “Backup” on the Dictation Module, so that a copy of the original file is preserved on your PC.
Go to Tools>Options>Backup tab>click “Enable Backup Function”>OK.
* NOTE: the DS3000 does not allow you to bypass the Olympus software. You must install a card reader and search the card reader as an external hard drive to download the files if using this device.
To find the file location for the DSS player folder on your hard drive, open the Dictation Module and right-click on a folder in the dictation tree – for example folder A. Select Properties from the draw down menu, and the Properties dialog box will appear. The Location field shows the location of your dictation files.
